
Sometimes we prefer to live in the moment and not think too much about the future. Unfortunately, while there’s a certain level of freedom with that kind of lifestyle. If you’re not the kind of person that enjoys the satisfaction of being proactive, then you’re probably not the kind of consumer that is diligent with their iPhone backups.
However, should something happen to your iPhone (hardware failure, liquid or fall damage, or any number of other problems) that results in the loss of your data then you may start singing a different tune altogether. It’s easy for us to take the information stored on our iPhone for granted until it’s gone. Do you want to have to deal with the loss of your photos, contacts, and old text messages while simultaneously facing the loss of your iPhone? One tragedy is enough, and all you need to do to avoid the trauma of lost data is to ensure you have a backup.
Why Should I Backup My iPhone?
Today, the number one reason for backing up your iPhone is because it’s easy. Between Apple’s iCloud backup service and the cross-platform availability of iTunes, you have no excuse to not have a recent backup.
Lost data isn’t fun and it can even be catastrophic if you use your iPhone for anything beyond recreation. Can you imagine losing business contacts? And even if your iPhone is for personal use only, try to picture the complete and utter loss of your photos. Many of us are parents and many of us have photos of our children stored on our iPhone that would be lost forever if not for our iPhone backups.
Backup Your iPhone to iTunes
It used to be that the only way to back up your iPhone was to use iTunes, which is a piece of software developed by Apple that is available for both Windows and Mac OS. iTunes has long been a popular way to buy, store, and listen to music, but it’s also been a longstanding method of backing up your iPhone or iPod. Creating an iPhone back up through iTunes is simple whether you’re a Mac or Windows user:
- Plug your iPhone into your computer using your lightning cable
- Open the iTunes software
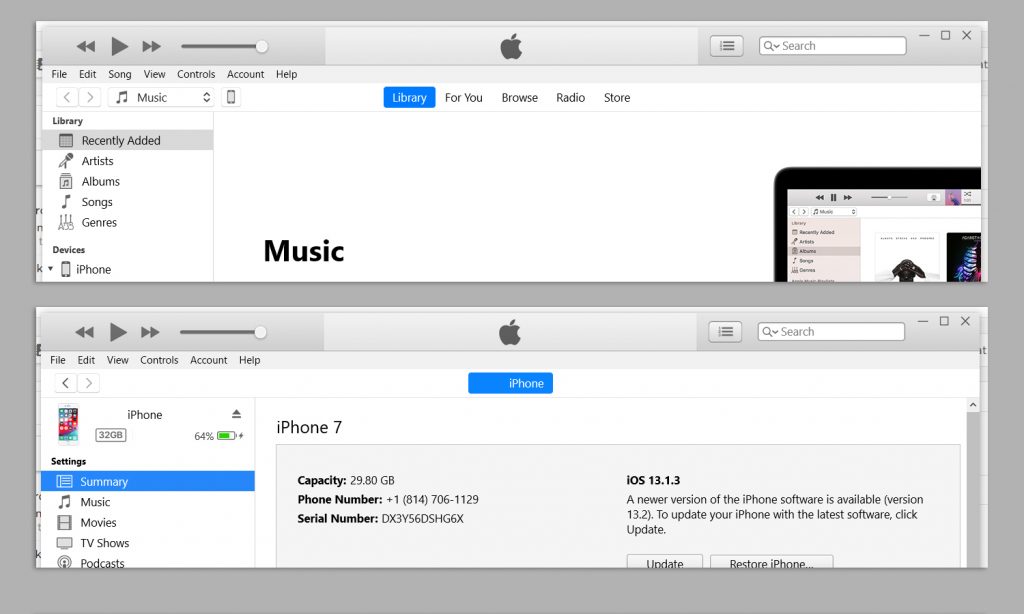
- Allow iTunes to recognize your iPhone—you should see the icon of an iPhone appear on the top navigation tab in iTunes
- On the iPhone status page, look for the “Backups” section
- Choose “This Computer” from the “Automatically Back Up” Section
- Click “Back Up Now” to force iTunes to begin a full backup of your iPhone
How Long Does This Method Take?
To put it simply—you’re creating a full copy of your iPhone and storing it locally on your computer’s hard drive. Several factors will affect the time it takes to finish a full backup:
- The size of the backup (your photos, apps, text messages, etc.)
- The speed of your computer and the amount of RAM is has
- The speed of your hard drive (SATA hard drives are much slower than solid-state drives)
However, you do have one advantage when backing up via iTunes. You’re not limited by your Internet connection. Instead, you’re limited by the speed of your computer and the maximum transfer speed of your lightning to USB cable, which is both typically much higher than your upload speed on a Wi-Fi connection.
You can expect a full, manual backup of your iPhone to take about an hour the first time. Subsequent backups will take less time since Apple will revise the backup rather than create a whole new one.
Can I Delete a Previous Backup?
iTunes backups can take quite a bit of space, especially if you’re using a computer that is already low on storage. If you’re down to just a few gigs of space on your computer, then the last thing you need is an old iPhone backup from 2 years ago taking of precious storage. Thankfully, iTunes allows you to delete iPhone backups even if the process is tucked away within the echelons of iTunes preference tabs:
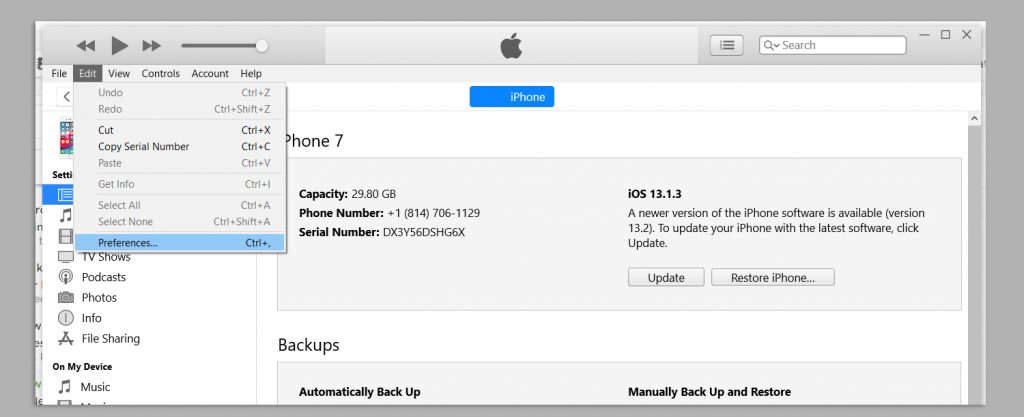
- Open iTunes
- Click on “Edit” from the top navigation tab
- Choose “Preferences” from the submenu
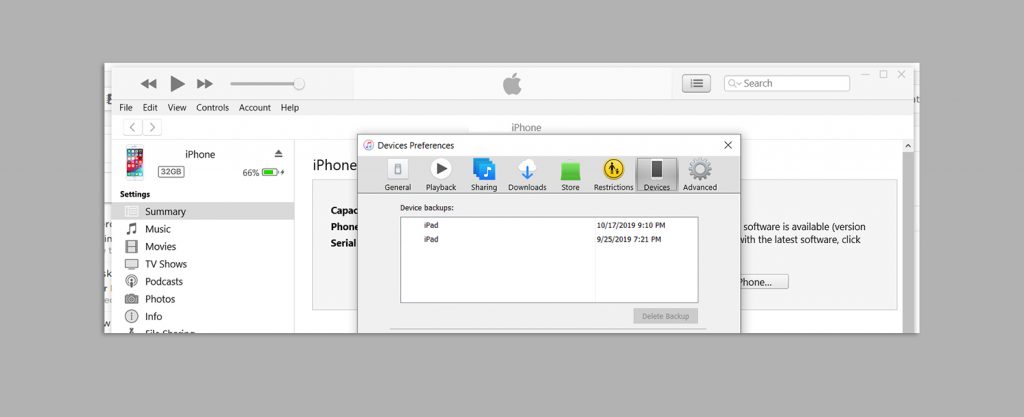
- Click on “Devices” from the “Device Preferences” window
- Choose a backup from the list
- Click the “Delete Backup” button
Backup Your iPhone to iCloud
A more streamlined and modern solution to the problem of backing up your iPhone is through iCloud. Apple’s website defines its iCloud service as follows:
iCloud securely stores your photos, videos, documents, music, apps, and more—and keeps them updated across all your devices. With iCloud, you can easily share photos, calendars, locations, and more with friends and family. You can even use iCloud to help you find your device if you lose it.
If you haven’t done it already, you’ll first need to register an iCloud account. Once that’s complete the hard part is over! Just do the following on your iPhone:

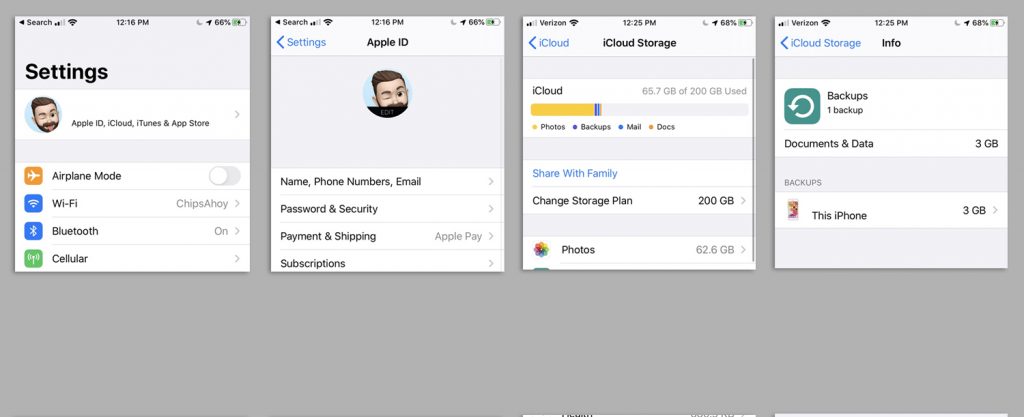
- Tap on the “Settings” app from your Home Screen
- Tap on your name at the top of the “Settings” screen
- Scroll down and tap on “iCloud”
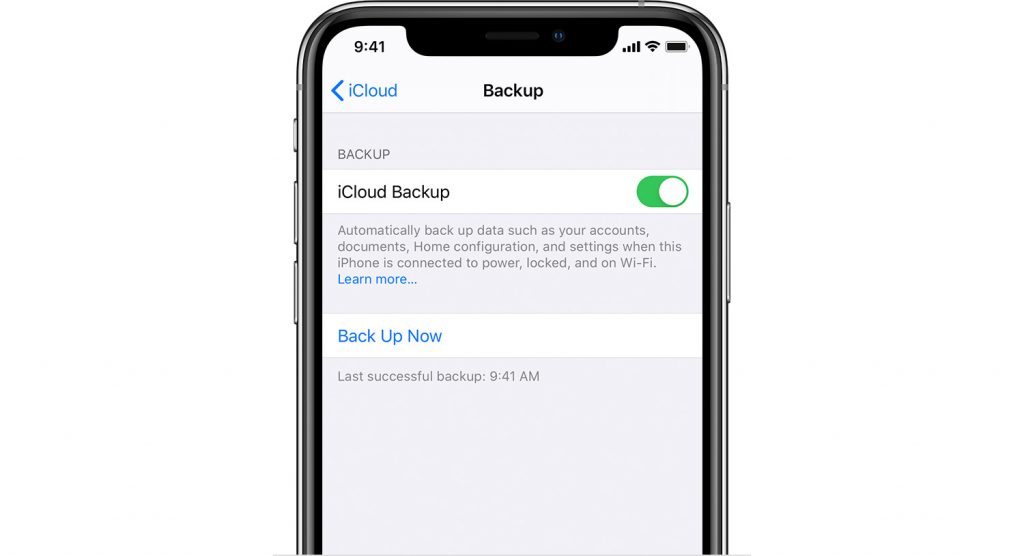
- Scroll down to “iCloud Backup” and tap on that selection
- Tap to turn “iCloud Backup” on
- Tap on “Back Up Now” to force your iPhone to begin a backup
How Long Does This Method Take?
Much like an iTunes backup, the speed of an iCloud backup is limited by several factors:
- The size of your backup
- The speed of your iPhone
- The speed of your internet connection
The two biggest contributors to a slow iCloud backup are the size of your backup and your internet connection. Typically, the first time you ever backup is the longest, as iCloud needs to do a full backup. Furthermore, while your download speed on Wi-Fi may be fast, upload speed is typically much slower, sometimes less than half the speed. When you back up via iCloud, you’re uploading all of that data to a secure Apple server. If you’re on slow Wi-Fi or even just average Wi-Fi and uploading gigs of data, then you can expect an iCloud backup to take several hours.
Luckily, iCloud backups will happen in the background without needing your attention. But sometimes watching an iCloud backup is like watching a pot boil—it’s suggested that you backup early before you need to. No one wants to sit in an Apple Store for three hours while they backup via Wi-Fi in preparation for a new iPhone. The rule of thumb is to do it before you need it.
Can I Delete a Previous Backup?
Deleting an iCloud backup is easy and, when push comes to shove, can be a last-ditch effort to making some space on a full iPhone. Just like with iTunes, Apple tucks away the ability to delete iCloud backups:
- Tap on the “Setting” app from your Home Screen
- Tap on your name at the top of the “Settings” screen
- Tap on “iCloud”
- Tap on “Manage Storage”
- Tap on “Backups”
- Tap on a backup from the list on the “Backups” screen
- Tap on the red “Delete Backup” button
Restore Your iPhone Data from a Backup
Knowing how to restore from a backup is just an important as knowing how to back up your iPhone in the first place. Luckily, Apple makes the process easy no matter if you backed up your device using iTunes or iCloud.
Restoring from an iTunes Backup
Whether your device is new or you simply want to revert to an older backup you can follow this process to restore from an iTunes backup.
- Plug your iPhone into your computer using a lightning to USB cable
- Allow iTunes to recognize your device
- Click on the iPhone icon from the top navigation bar
- From the iPhone screen, choose “Restore iPhone” from the selection at the top right
- Choose from the list of backups that iTunes has stored on your computer
Restoring from iCloud
The process of restoring from iCloud is simple assuming you know the username and password of your iTunes account.
- Power on your device
- Navigate through the “Hello” screen until you’re prompted with the “Apps & Data” section
- Choose “Restore from iCloud Backup” from the list
- Sign in to your iCloud account
- Ensure you’re connected to Wi-Fi and follow the on-screen process to complete your iCloud restore
Alternative Ways to Back Up Your iPhone
Sometimes we may want the ability to back up our iPhone without the use of iCloud or even iTunes. While it’s true that Apple keeps a lockdown on the hardware and software connectivity of their devices, there is software on the market that will allow you to create complete, locally-stored backups without the use of any Apple-branded software.
The website thesweetbits.com did some digging to vet a few of the most popular backup solutions. They found the following results and published them here.
To summarize their article, it seems that the two pieces of software you should investigate as a third-party iPhone backup solution are “dr.fone” and “iMazing”.
Backing Up Your iPhone Brings Peace of Mind
However you do it, you should ensure that you’re making frequent backups of your iPhone. Your data is precious—losing it is just adding more stress to an already stressful situation. And ensuring you have a solid backup process in place before you need it is the best peace of mind you can give yourself should something happen to your iPhone.


